MAKING BLOG POSTS.
In the top navigation window, go to New and select Post from the dropdown menu. Once the new post is created, give it a title in the top field, then check the Blog box in the Categories section on the right. Next, click the Save Draft button at the top right under Publish. Now you can add text, photos, etc. for the new blog post.
FORMATTING TEXT:
First, make sure the Toolbar Toggle is on (it’s this button):

You’ll find most of your standard text formatting options here (bold, center, etc.) as well as some pre-formatted styles from the style dropdown menu. You can add links here as well. You also have buttons at the top for adding forms, galleries and shortcodes. These can add some extra options to your blog posts like external videos (like YouTube videos), specialized formatting and styles, and a bunch of other cool stuff.
ADDING PHOTOS:
Click the Add Media button to add photos to your blog post. You can choose from photos you already have in your Media Library or you can select the Upload Files tab at the top of the page and upload new photos. When your photo is selected, look at the option on the right of the screen. You can give it a title, caption, etc. (which helps with SEO) as well as place the photo on the left, center or right, and pick how big you want it displayed (which you can easily change later if needed). Click the Insert into post button when you’re done. Once your image is on the page, you can click on it to change the alignment or the size (click the little pencil icon to change the size). You can select Custom Size from the Size dropdown menu to make the photo whatever size you need.
PUBLISHING YOUR BLOG POST:
Before you publish, go down to the Featured Image section at the bottom right and click the Set featured image link. If you added any photos to this blog post, select it (or any other photo you want) from the Media Library and then click the Set featured image button at the bottom right. Without a featured image selected, there will be no picture next to this blog post on the main Blog page.
Once you’re ready to publish, go up to the Publish section at the top right. You have some options there to publish it privately or password-protected, as well as whether to publish it immediately or schedule it to publish whenever you want. Once you’re ready, just hit Publish. Once it’s published, click the View Post link that appears at the top of the page to see the post.
EDITING BLOG POSTS:
Click on Posts in the left navigation menu. At the top of the page, you’ll see a dropdown menu labeled All Categories. Click that menu and select Blog, then click the Filter button just to the right. All of your blog posts will be displayed below that. Click on the post you want to edit and make any necessary changes.
FORMS.
Select Ninja Forms from the left navigation menu. Click Dashboard to edit an existing form or click Add New to make a new one.
Editing an existing form. Find the form you want to edit and click the gear icon to the right of the form name. You’ll see several options for making changes to the form; click on the Edit link to make changes to the form. Once you’re inside the form, click the gear icon to the right of whichever parts you want to change. Once you’ve made your changes, click the Done button. Click the big + button at the bottom right to add new elements to the form. There’s more instructions on that in the next section about new forms.
Creating a new form. Click on the Blank Form box. Click the big + button at the bottom right to add new elements to the form. You can drag any of the items on the right and place them above or below any of the existing items on the form on the left. You’ll see a green bar appear in the space where your new item will be placed. Once you’ve placed an item where you want it, click the gear icon next to it to modify it.
Publishing a form. Once you’re finished, click the Publish button at the top right, then click the X button to get back to the Dashboard. You can now see your updated form on the website after you refresh the page.
Adding a form to page or post. When you’re creating or editing a page or post, you can click the Add Form button in the tool section below the title to insert a form wherever you want it on the page or post. You can also just copy and paste the shortcode, which you can find on the Ninja Forms Dashboard.
NOTE: Forms are automatically emailed to the site admin email address (which is yours, you are the admin).
EDITING THE MENU.
Select Appearance from the left navigation menu and click Menus. On the Menus page, click the dropdown menu next to Select a menu to edit and select a menu, then click the Select button. You can use the options on the left to add a new menu item, or click on the small triangle on one of the existing menu items to edit it. You can also move the menu items around by clicking and dragging them. Once you’re finished, click the Save Menu button at the top right.
PORTFOLIO.
Click on Envira Gallery in the left navigation menu. Click on the Portfolio link.
Adding and moving photos. Click the Select Files from Your Computer button and select the images you want to add (you can select multiple files at once). You can click and drag the photos to arrange them however you like. You can also add photos you already have in your Media Library by click the Select Files from Other Sources button.
When you’re finished, click the Update button.
HOMEPAGE.
PAGE TITLE. Click on Pages in the left navigation menu. Click on the OLIVIA ROSE // FETISH QUEEN — Front Page link. Change the title at the top to change the header text on the homepage.
HOMEPAGE PHOTO. You can delete this photo and replace it with another if you like. Just click the image on the page and hit the delete button on your keyboard. You can insert a new image here the same way you do for a blog post (see above).
HOMEPAGE SECTIONS. Click on Posts in the left navigation menu. At the top of the page, you’ll see a dropdown menu labeled All Categories. Click that menu and select Homepage, then click the Filter button just to the right. All of the posts on the homepage will be displayed below that. Click on the post you want to edit and make any necessary changes. You can edit these just like blog posts (see above).
BUTTONS. Click on Envira Gallery in the left navigation menu. Click on the Homepage Buttons link. Click on the button image you want to edit and then click the blue pencil icon:
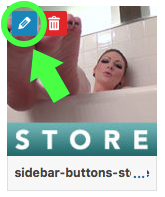
From here you can update the URL for the button. Click the Save Metadata button and then click the big x button at the top right. Click the Update button at the top right.
You can also add new buttons and/or replace the current buttons. You can update this gallery the same way you update the Portfolio gallery.